Previous entry:
Highlights from the Trip
Next Entry:
A Brief Knitting Vacation
Home:
One Truth For All
| Sun | Mon | Tue | Wed | Thu | Fri | Sat |
|---|---|---|---|---|---|---|
| 1 | 2 | 3 | 4 | 5 | ||
| 6 | 7 | 8 | 9 | 10 | 11 | 12 |
| 13 | 14 | 15 | 16 | 17 | 18 | 19 |
| 20 | 21 | 22 | 23 | 24 | 25 | 26 |
| 27 | 28 | 29 | 30 | 31 |
Archives
- May 2008
- April 2008
- March 2008
- February 2008
- December 2007
- November 2007
- October 2007
- September 2007
- August 2007
- July 2007
- May 2007
- April 2007
- March 2007
- February 2007
- December 2006
- November 2006
- October 2006
- September 2006
- August 2006
- July 2006
- June 2006
- May 2006
- April 2006
- March 2006
- February 2006
- January 2006
- December 2005
- November 2005
- October 2005
- September 2005
- August 2005
- July 2005
- June 2005
- May 2005
- April 2005
- March 2005
- February 2005
- January 2005
- December 2004
- November 2004
- October 2004
- September 2004
- August 2004
- July 2004
- June 2004
- May 2004
- April 2004
- March 2004
- February 2004
- January 2004
- December 1969
September 13, 2007
Paste of the Quince that Hit You
Noel and I spent two days making a giant pile of quince paste. This is not recommended as a regular activity, unless you want to build really burly arms. I will describe the process in less than perfect detail:
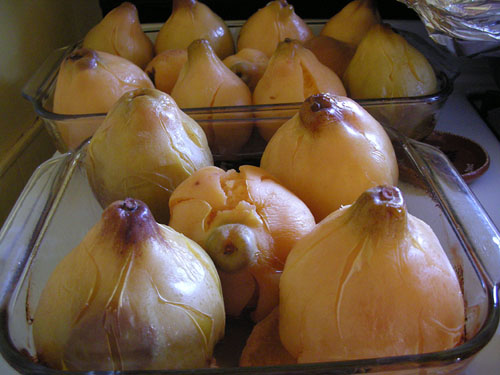
Wash and dry quince, then roast in covered pans for an hour and a half or so. Here we have two of our three roasting pans of quince. Num.

The other option is to peel and core the quince then boil the heck out of them, but that seemed like a lot of work. Once the quince were roasted, peeling was basically irrelevant, though you can still peel them if you want, and coring was easy.
Technorati Tags: cooking, fruit, quince
Then we put the chunks in the Cuisinart and processed the heck out of them. No simple chopping here; I let the blades turn that stuff into mush. You could not tell where the skin had been. I love that machine.
The recipe we had suggested using a food mill. This is crazy-talk. There is no need for a food mill when you have electricity and a Cuisinart. And you're about to work out enough with the stirring.
Then you measure the paste, add its equal volume of sugar, and boil this on the stove for, like, four hundred hours while stirring constantly and dodging spatters of hot quince paste, as your arms slowly lose feeling and grip strength and soon you are not sure you wanted arms to begin with and what would it take to design a little stirring robot that could do this for you? (I want this stirring robot BAD.)
Noel did all the stirring, thank goodness. You stir the stuff until it's lost about half its volume and is coming together as a solid. This is why we used the roasted quince method. The more water, the longer the stirring. We worked from waterless quince mush and each batch took about an hour or more to cook down. Can you imagine with water?
When it's nice and thick, you pour it into a mold (we used oiled roasting pans and non-stick cupcake tins; both worked fine, though if you plan to give the finished product as a gift go with a cupcake mold for nice-sized cakes, maybe even shaped cupcakes if you're feeling fancy) and let it cool. Then you cover it with plastic wrap and chill it overnight in the fridge, to get any last thoughts of escape out of it.
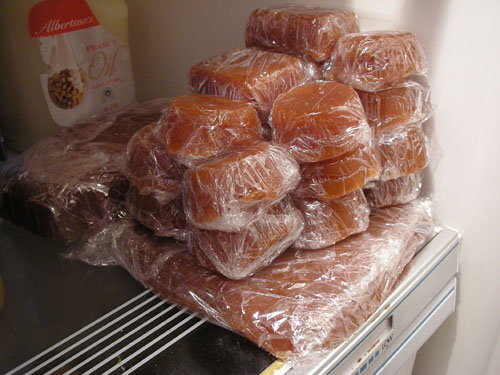
The next day you can use a spatula to encourage the stick cakes to flobble out on the counter, where you catch them and wrap them firmly in plastic then stuff them back in the fridge for storage.

This stuff keeps for MONTHS, although it is tasty enough that it may not last that long. We have a big loaf we're planning to take to a party on Saturday; there will not likely be any leftovers.
Next up: Asian Pear jelly, because we had a bunch of windfall fruit come down unripe. Perfect for jelly-making!
Posted by ayse on 09/13/07 at 3:02 PM
Well, save one for me!
Of course there is one (or more, if you'd like) for you. Silly Herself.